One of the most important factors that will affect costs is the level of protection required to extend the growing season. Protection for year-round growing will be the most expensive since it will require more insulation and a heat source, as well as supplemental lighting. A simple garden box with poly cover is an inexpensive option which can extend the growing season by several weeks in the spring and again in the fall. The least expensive option is to grown in the space we are already heating - our own homes. An East or South facing window can be great to grow a wide variety of herbs or small greens.
Season extension
Simply shovelling the soil into a raised bed will allow the soil to warm more quickly in the spring. In addition, a sheet of clear poly laid over the bed and anchored with rocks will warm soil so seeds will germinate more quickly. As soon as the seedlings emerge, replace the poly with a floating row cover or poly tunnel. A floating row cover not only helps warm the soil, it protects plants from wind damage and reduces water loss by evaporation. As a bonus, there is often less insect or rodent damage to vegetables under a row cover.
A 1 metre by 7 metre piece of fabric for frost protection costs about $10.
A 1 metre by 7 metre piece of fabric for frost protection costs about $10.
Cold frame

Easier on your back, a framed-in box for growing also prevents soil compaction from people walking around the plants. Plants can be spaced more closely which will help reduce weeds and will shade the soil to minimize water loss. A framed garden box also allows for adding heat storage below the soil. Lay a length of perforated pipe in the bottom of the box, fill the box with rocks, cover with landscape fabric and fill with soil. Flexible pipe, wires, or sticks wedged into the sides of the garden box can support woven or clear poly for added protection. A small computer fan can move warm air down into the rocks to warm the soil from below at night and reduce overheating during the day. (Construction details.)
Unheated greenhouse
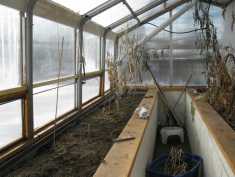
The key to efficient use of an unheated greenhouse is to insulate the north wall and at least the north part of the roof to minimize heat loss during the night. Prevent overheating during the day by using a fan to move the heated air from the peak of the greenhouse under the beds where the heat can be stored in rocks to be slowly released at night.
This greenhouse was built using the recycled frame from a tarp shed. (Construction details.)
This greenhouse was built using the recycled frame from a tarp shed. (Construction details.)
Conventional heated greenhouse
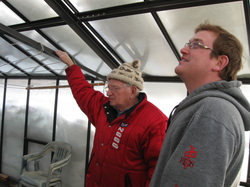
Originally built with floor to ceiling polycarbonate walls on all four sides as well as a polycarbonate roof, this greenhouse was expensive to build as well as use. As a result of the high operation cost, production was often shut down by early September. Last fall, this greenhouse was retro-fitted with insulation on the north roof and north wall. Ideally, heat storage, perhaps in the form of large containers of water, will be added prior to the next growing season.
Heated greenhouse with supplemental lighting
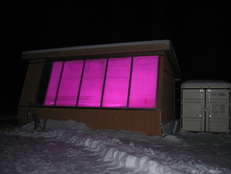
The same principles of storing heat generated during the day to be released at night and preventing heat loss by maximizing insulation apply to a year round greenhouse. Heat storage options include water as well as rocks if freezing won't be an issue. LED lights for supplemental lighting use very little energy, but have a higher initial cost. Foam insulation won't be damaged by moisture. A shutter system which can be closed during really cold weather or at night conserves more heat. Shutters can also be used to reduce overheating on sunny summer days. An arctic entrance protects plants from cold blasts and provides a dry place to hang coats in winter.
This greenhouse took 4 students and their instructor 4 months to construct.
This greenhouse took 4 students and their instructor 4 months to construct.
